![]()
Test Development
Commander supplies a versatile Test structure that enables you to develop realistic performance Tests. Create and run Tests to accurately simulate the web activity required and to generate the load levels you want against target web application environments.
In its simplest form a Test can consist of just one Task Group running a single Script with no data collection Profiles, relying on results which are automatically collected during a Test-run. However, to produce a fully automated performance Test that accurately simulates the test scenario you want, as well as producing the results data required, it is usually necessary to develop a more detailed Test structure. Use Commander to create Tests incorporating Script-based Task Groups, which can include a number of sequenced Scripts. Add Profile-based Task Groups to your Tests to collect user-defined performance data from the Hosts used to run the Test.
After you have planned your Test you need to develop it by creating the Scripts and Profiles you want to include. Use Commander to coordinate the Test development process by selecting the Scripts and Profiles you need and combining them into a new Test with the required Task Group settings applied. Task Group settings control the load generated during a Test-run and which Hosts are used to run the Tasks Groups defined in your Test.
After you have run the Test you can display the results collected to assist in the analysis of target web application environments construction. Modify the Task Group settings to control the load generated during a Test-run and to produce the results you need.
Test Creation
After you have created the Scripts and Profiles you want to include you are ready to create a new Test. Use the right-click menu function associated with the
Tests folder in the Repository Window, or select File > New Test > Tests in the Menu Bar. Give your Test a name, then double-click the new Test
, in the Repository Window to open it in the Active Test Pane.
In Commander a Test is represented as a table known as the Active Test Pane. This is the workspace where you develop the contents of a Test by adding the Scripts and Profiles you need from the Repository. Select them individually working from the Repository Window, then drag and drop them into the Active Test Pane in the required order.
The Scripts and Profiles you add to a Test are known as Tasks which are represented by Task Groups. Each Task Group occupies a row within a Test and can be of two types, either Script-based or Profile-based. A Test must include at least one Script-based Task Group which can incorporate one Script or a sequence of Scripts. Profile-based Task Groups contain a single Profile. There is no limit to the number of Task Groups you can add to a Test.
Make use of the Duplicate Task Group function to copy a Task Group. Duplicating a Task Group then editing the Task Group Definition enables you to speed up the Test development process. You can access this function from the Active Test Pane by right-clicking on the Task Group you want to duplicate and selecting the menu option.
After you have incorporated the Task Groups you need, specify their settings to control the load generated during a Test-run. For example, increasing the number of Virtual Users, raises the load level generated against a target web site during a Test-run. Task Group settings also include specifying which Hosts are used to run the Task Groups during a Test-run.
There is only a single instance of the Scripts and Profiles you create. They are included in Tests by reference which means they can be included in many different Tests or in the same Test as separate Tasks. Any changes you make to Scripts or Profiles are immediately reflected in the Tests that use them. Scripts and Profiles that you incorporate in a Test can be removed by overwriting them with new selections or by deleting them from the Active Test Pane.Removing Tasks from a Test does not delete them from the Repository.
Tests are stored in the Repository. When you create a new Test, a folder bearing the name of the Test is created, for example:
Note: A Test name must be defined according to the rules for OpenSTA Datanames, with the exception that the name can be up to 60 characters long.
After you have added the Scripts and Profiles you need and applied the Task Group settings required, the Test is ready to run.
The Active Test Pane
In the Active Test Pane, a Test is represented as a table where it can be developed and edited. The
Configuration tab view of the Active Test Pane is displayed in the Commander Main Window when you open a Test by double-clicking a new Test
, in the Repository Window.
Work through the tabs of the Active Test Pane to setup and edit a Test. Use the Repository Window in combination with the Active Test Pane to select the Scripts and Profiles you want, then add them as separate Tasks within Task Groups to your Test. Use the Active Test Pane to assign the Task Group settings you want to apply during a Test-run.
The Active Test Pane comprises three sections represented by the following tabs:
·
·Monitoring: Click on this tab to monitor the progress of a Test during execution. Display a progress summary or monitor a specific Task Group.
·Results: Click on this tab to view the results data collected during a Test-run in graph and table format, connected to specific Task Groups.Active Test Pane Features
The Configuration tab view of the Active Test Pane is displayed below:
Creating Tests
Work from the Repository Window, located by default on the left of the Commander Main Window, to create new Tests and to open existing ones. The Repository Window displays the contents of the Repository and functions as a picking list from where you can select the Scripts and Profiles you want to include in a Test. Use it in conjunction with the Active Test Pane to develop the contents of a Test. Select a Script or Profile from the Repository Window then drag and drop it on to the Task column of the Active Test Pane to create a Task within a new Task Group.
The Scripts and Profiles you add to a Test are referred to as Tasks. One or a sequence of Script Tasks are represented by a Script-based Task Group. A Profile Task is represented by a Profile-based Task Group.
When you have included all the Scripts and Profiles you need, apply the Task Group settings you require from within the Active Test Pane to control the load generated during a Test-run. Task Group settings include:
When you add a Script to a Test a new Script-based Task Group is automatically created and the Task Settings dialog box appears. Use it to control the number of times a Virtual User runs a Script and the delay you want to apply between each iteration of a Script when a Test is run. You can also specify the type of delay, between esach Script iteration, either Fixed or Random.
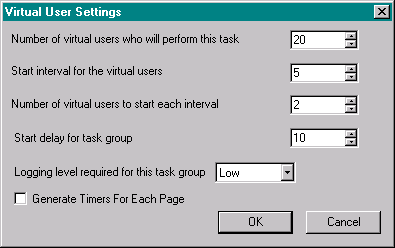
The load generated against target web sites during a Test-run is controlled from the Virtual User Settings dialog box. Double-click on the VUs column of a Script-based Task Group and specify the number of Virtual Users you want to run the Task Group. You can specify a Start interval in seconds to control when the Virtual Users run a Task and select how many of the Virtual Users you want to start at each interval. A Start delay for each of group of Virtual Users can also be defined. Logging levels can be set here which determine the level of HTTP performance statistics gathered from Virtual Users running the Tasks.
You can also select to Generate Timers for each web page. This option records results data for the time taken to load each web page specified in a Scripts, for every Virtual User running the Script.
Specify the Host computer you want to run a Task Group by double-clicking on the Host column table cell within a Task Group and selecting a networked Host.
The Test Development Process
The Test development process typically includes the following procedures:
The Test appears in the Repository Window with a small crossed red circle over the Test icon
2 In the Repository WIndow give the Test a name, which must be an OpenSTA Dataname, with the exception that the name can be up to 60 characters long, then press Return.
Note: The new Test is saved automatically in the Repository when you switch to a different function or exit from Commander.
2 Double-click a new Test
The Configuration tab of the Active Test Pane presents you with an empty table where you can add the contents of your Test and apply Task Group settings.
3 Click on a Script then drag it across to the Active Test Pane and drop it in a new row under the Task 1 column, as shown below:
· The selected Script,SCRIPT_1, appears in the first row under the first Task column as a new Task Group.
· The Task Group name is taken from the Test name and includes a number suffix which is automatically incremented as new Task Groups are added to the Test.
· The Host column defaults tolocalhost, which refers to the computer you are currently working on. The Host you select here determines which computer or device that run the Task Group during a Test-run. The Host can be changed by double-clicking on this table cell and entering the name of a new Host or selecting one from the list.
· The VUs column displays the number of Virtual Users assigned to run a Task Group. The default is a single Virtual User1.
4 The Virtual User Settings dialog box appears automatically after you drag and drop a Script into the Active Test Pane. You are prompted to specify the number of times, or the number of iterations, a Virtual User will run the Script during the Test-run. Enter a value in the Iterations text box.
5 If required you can specify a Fixed or Variable delay between each Script iteration. Or you can click OK to accept the default settings and return later to edit your Task settings if you choose.
· Click Variable Delay and enter a time value in seconds in the Min and Max text boxes to set the upper and lower limits of variable iteration delay.
Note: Double-click a Script in the Active Test Pane to re-open the Task Settings dialog box and edit your Task settings.
7 If your Task Group incorporates more than one Script, select the next Script from the Repository Window and drag and drop it into the same row as the first Script under the next Task column. Repeat this process until your Script sequence is complete.
8 Add additional Scripts as part of a new Task Group by dragging and dropping a Script onto the next row down.
3 Click on a Profile then drag it across to the Active Test Pane and drop it in a new row under the Task 1 column, as shown below:
· The Profiles selected in the example abovePROFILE NT and
PROFILE-SNMP, appear in the second and third rows under the first Task column in separate Task Groups. A Profile based Task Group can only contain a single Task.
· The Task Group name is taken from the Test name and includes a number suffix which is automatically incremented as new Task Groups are added to the Test.
· The Host column defaults to
Profile-based Task Groups include a Profile which defines a set of data to be collected from one or more Hosts during a Test-run. The Host Task Group setting you define within a Test controls which Host runs the Task Group not which Host data is collected from.
Note: Your changes are saved automatically in the Repository when you switch to a different function or exit from Commander.
3 In the Task Settings dialog box specify the number of times, or the number of iterations, a Virtual User will run the Task during a Test-run. Enter a value in the Iterations text box.
· Click Variable Delay and enter a time value in seconds in the Min and Max text boxes to set the upper and lower limits of variable iteration delay.
Note: Your changes are saved automatically in the Repository when you switch to a different function in or exit from Commander.
3 In the Virtual User Settings dialog box enter the number of Virtual Users who will run the Task Group in the text box.
6 Add a Start delay value in seconds, in the text box to stagger the start time for the Virtual Users.
In the example below, 20 Virtual Users are assigned to the Task Group. The Task Group itself will be delayed by 10 seconds from the start of the Test-run, and when it runs 2 Virtual Users will run every 5 seconds.
7 Select the Logging level required for the Task Group to control the level of performance statistics gathered from Hosts. Click and select either:
8 Click the Generate Timers For Each Page check box, to record results data for the time taken to load each web page specified in the Scripts, for every Virtual User running the Scripts. Timer information is recorded for the duration of the complete Script if the box is checked or unchecked.
Note: Your changes are saved automatically in the Repository when you switch to a different function in or exit from Commander.
The Host you select here determines which computer or device will run the Task Group during a Test-run.
Note: The Host column defaults to
Profile-based Task Groups include a Profile which defines a set of data to be collected from one or more Hosts during a Test-run. The Host Task Group setting you define within a Test controls which Host runs the Task Group not which Host data is collected from.
Note: Your changes are saved automatically in the Repository when you switch to a different function in or exit from Commander.
Note: The Script or Profile that you remove is not deleted from the Repository since they are included in Tests by reference.
2 Select the Script or Profile you want from the Repository Window and drag and drop it onto the Task (a Script or Profile) in the Active Test Pane that you want to replace.
The Script or Profile that you overwrite is not deleted from the Repository since they are included in Tests by reference.
Note: Your changes are saved automatically in the Repository when you switch to a different function in or exit from Commander.
When you have finished creating a Test you need to compile it to check the integrity of the Scripts contained and to generate a .TOF file which is used to run the Test. It is good practice to compile your Scripts as you create them in Script Modeler.
3 When your Test compiles successfully you are notified with an on-screen message. Click OK in the dialog.
A Compile Errors dialog appears if compilation is unsuccessful, detailing the nature of the problem.
Note: If you have not compiled a Test before you run it, clicking the Test-run button, automatically compiles the Test.
· The Test related work you perform is automatically saved in the Repository and the Test is closed when you switch to a different function or exit Commander.
| CYRANO Customer Support: France +33 (0) 1 56 33 40 00 USA +1 (978) 462-0737 UK +44 (0) 1274 761024 support-fr@cyrano.com support-us@cyrano.com support-uk@cyrano.com |
 in the toolbar to compile.