![]()
Creating and Editing Tests
- Test Development
- Test Creation
- The Test Pane
- Tasks and Task Groups
- Task Group Settings
- The Test Development Process
Test Development
After planning your Test, use Commander to coordinate the Test development process.
The contents and structure of your Test will depend on the type of Test you are conducting, the nature of the system you are targeting and the aims of your performance Test. In its simplest form a Test can consist of just one Task Group running a single Collector or a Script. However, to produce a fully automated performance Test that accurately simulates the test scenario you want, as well as producing the results data required, it is usually necessary to develop a more detailed Test structure.
Script and Collector Tasks are contained by Task Groups in a Test. Task Groups enable you to control when Tasks run and how they operate during a Test-run. A Test can include one or more Collector-based Task Groups, one or more Script-based Task Groups or a combination of both, depending on whether you are developing an HTTP/S load Test or a production monitoring Test. Add Scripts to generate the HTTP/S load levels required against target systems during a Test-run. Add Collectors to monitor and record performance data from Hosts.
The Task Groups that comprise a Test can be enabled or disabled, before or during a Test-run. Disabling the Script-based Task Groups means that no load is generated when the Test is run. This gives you the ability to use the same Test within both load Test and production monitoring scenarios and enables you to directly compare the performance of a target system within these two environments. After you have added the Scripts and Collectors you need and applied the Task Group settings required, the Test is ready to run.
Tests can be run using networked computers on remote Hosts to execute the Task Groups that comprise a Test. Distributing Task Groups across a network enables you to utilize the processing resources of multiple networked computers. It is then possible to run HTTP/S load Tests that generate realistic heavy loads simulating the activity of many users. In order to do this, HTTP/S Load must be installed on each Host and the OpenSTA Name Server must be running and configured to specify the Repository Host for the Test. For more information on configuring the OpenSTA Name Server to run a distributed Test, see Distributed Tests.
During a Test-run you can monitor Task Group replay from within the Test Pane. Then display the results collected after a Test-run is complete to assist you in analyzing and improving the performance of target systems.
See also:
Test Creation
After you have created the Scripts and Collectors you need, you are ready to create a new Test. Use the right-click menu function associated with the
Tests folder in the Repository Window, or select File > New Test > Tests in the Menu Bar. Give your Test a name, then double-click the new Test
, in the Repository Window to open it.
In Commander an open Test is represented as a table which is displayed in the Test Pane. This is the workspace where you can develop the contents of a Test by adding the Scripts and Collectors you need from the Repository. Select them individually working from the Repository Window. Drag and drop them into the Test Pane in the required order.
When you add a Script or Collector to a new row in the Test table, a new Task and Task Group are automatically created. Select a Task Group table cell and apply the settings you require using the Properties Window located at the bottom of the Test Pane to control when a Task Group starts, the Host used to run the Task Group and the load generated by Script-based Task Groups when a Test is run. Click
, in the toolbar to hide and display the Properties Window.
There is only a single instance of the Scripts and Collectors you create. They are included in Tests by reference which means they can be included in many different Tests or in the same Test as separate Tasks. Deleting a Test has no affect on the Scripts and Collectors it contains, and similarly, removing Tasks from a Test does not delete them from the Repository. Any changes you make to Scripts and Collectors are immediately reflected in all the Tests that use them. The Scripts and Collectors that you incorporate in a Test can be removed by overwriting them with new selections or by deleting them from the Test Pane.
Make use of the Duplicate a Task Group function to duplicate a Task Group then edit the Task Group Definition to speed up the Test development process. You can duplicate or delete a Task Group by right-clicking on a Task Group and selecting the required popup menu option.
Tests are saved as .TST files and are stored in the Repository. A Test name must be defined according to the rules for OpenSTA Datanames, with the exception that the name can be up to 60 characters long.
As part of the Test creation process you can make use of the single stepping functionality provided to check that your HTTP/S load Tests run as required during replay. For more information see Single Stepping HTTP/S Load Tests.
If you are developing a Test which includes Scripts that run in sequence within the same Task Group you need to model the Scripts for the Task Group to replay correctly when the Test is run. If your WAE uses cookies or issues session identities, then each Script you create will contain a unique identity that has no connection to the other Scripts included in the Task Group. You need to establish a connection between the Scripts by modeling them.
See also:
Developing a Modular Test Structure
The Test Pane
Use the Test Pane to create and edit a Test, then apply the Task Group settings you require to control how they behave during a Test-run. Run and monitor the Test-run then display your results for analysis.
The Test Pane is displayed in the Main Window when you open a Test by double-clicking a new Test
, in the Repository Window.
The Test Pane comprises three sections represented by the following tabs:
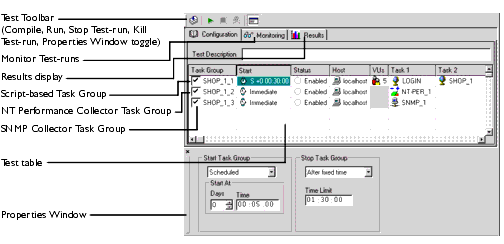
Configuration: This is the default view when you open a Test and the workspace used to develop a Test. Use it in combination with the Repository Window to select and add Scripts and Collectors. It displays the Test table which has categorized column headings that indicate where Script and Collector Tasks can be placed and the Task Group settings that apply to the contents of the Test.
Select a Task Group cell to view and edit the associated settings using the Properties Window displayed below the Test table. For more information, see Tasks and Task Groups.Monitoring: Use this tab to monitor the progress of a Test-run. Select the display options you want from the Monitoring Window, including a Summary and data for individual Task Groups. For more information, see Running Tests.
Results: Use this tab to view the results collected during Test-runs in graph and table format. Use the Results Window to select the display options available which are dependent on the type of Test you are running. For more information, see Results Display.
Test Pane Features
The Configuration tab view of the Test Pane is displayed below:
See also:
Tasks and Task Groups
Work from the Repository Window to create new Tests and to open existing ones. Its default location is on the left-hand side of the Commander Main Window,
The Repository Window displays the contents of the Repository and functions as a picking list from where you can select the Scripts and Collectors you want to include in a Test. Use it in conjunction with the Configuration tab of the Test Pane to develop the contents of a Test. Select a Script or Collector from the Repository Window then drag and drop it on to a Task column in the Test table.
The Scripts and Collectors you add to a Test are known as Tasks which are contained within Task Groups. When you add a Script or Collector to a new row in the Test table a new Task and Task Group are automatically created. Each Task Group occupies a single row within the Test table and can be one of two types, either Script-based or Collector-based. A Script-based Task Group can incorporate one Script or a sequence of Script Tasks. Collector-based Task Groups contain a single Collector Task.
Task Groups enable you to control the behavior of the Scripts and Collectors they contain during a Test-run. Select a Task Group cell and apply the settings you require using the Properties Window of the Configuration tab, located at the bottom of the Test Pane. Task Group settings control when a Task Group starts, the Host used to run the Task Group and the load generated by Script-based Task Groups when a Test is run.
When you add a Script or Collector to a Test, you can apply the Task Group settings you require or you can accept the default settings and return later to edit your settings.
The Task Group cells in the Test table are dynamically linked to the Properties Window below, select them one at a time to display and edit the associated Task Group settings in the Properties Window.
Select the Start or Host cells in a Task Group row to control the Schedule and Host settings. Script-based Task Groups and the Script Tasks they contain have additional settings associated with them. Select the VUs and Task cells to control the load levels generated when a Test is run.
Use the Disable/Enable a Task Group option to control which Task Groups are executed when a Test is run. This is a useful feature if you want to disable Script-based Task Groups to turn off the HTTP/S load element. The Test can then be used to monitor a target system within a production scenario.
Task Group Settings include:
- Schedule Settings: apply to Script-based and Collector-based Task Groups
- Host Settings: apply to Script-based and Collector-based Task Groups
- Virtual User Settings: apply to Script-based Task Groups only
- Task Settings: apply to Script Tasks only
See also:
Task Group Settings
Schedule Settings: apply to Script-based and Collector-based Task Groups
Schedule settings enable data to be collected, or an HTTP/S load to be applied, over specific periods by controlling when Task Groups start and stop during a Test run. Click on the Start cell in a Task Group and use the Properties Window to specify your Schedule settings. Once a Test is running, Schedule settings cannot be edited, but they can be overridden manually using the Start and Stop buttons that appear in the Status column of a Task Group.
The default setting for a Task Group to start is when the Test is run. The Scheduled option starts a Task Group after the number of days and at the time you set. The Delayed option starts a Task Group after the period of time you set, relative to when the Test was started.
There are three options for stopping Task Groups. Manually, means that the Task Group will run continuously until you intervene to end it using the Stop button in the Status column of the Task Group that becomes active during a Test run. You can also schedule a Task Group to stop after a fixed period of time and for Script-based Task Groups only you can instruct the Task Group to stop after completing a number of iterations.
For more information, see Edit the Task Group Schedule Settings.
Host Settings: apply to Script-based and Collector-based Task Groups
Specify the Host computer you want to use to run a Task Group during a Test-run. Click on the Host cell in a Task Group and use the Properties Window to select a Host.
For more information, see Select the Host Used to Run a Task Group.
Virtual User Settings: apply to Script-based Task Groups only
The load generated against target Web Application Environments (WAEs) during a Test-run is controlled by adjusting the Virtual User settings. Click on the VUs cell in a Script-based Task Group and use the Properties Window to specify your Virtual User settings.
Specify the number of Virtual Users you want to run the Task Group to control the HTTP/S load generated when the Task Group is run. Logging levels can be set here to specify the amount of HTTP/S performance statistics gathered from the Virtual Users running the Task Group. Select the Generate Timers option to record the time taken to load each Web page specified in a Script by each Virtual User running the Script.
Use the Batch Start Option to ramp up the load you generate by controlling when the Virtual Users you have assigned to a Task Group run. This is achieved by starting batches of Virtual Users at intervals over a period of time, with a delay between the start of each batch period.
For more information, see Specify the Virtual Users Settings for a Script-based Task Group.
Task Settings: apply to Script Tasks only
Edit the Task settings to control how many times a Script is run. Click on a Task cell in a Script-based Task Group and use the Properties Window to specify your Task settings.
You can schedule a Script Task to stop after a fixed period of time or after completing a number of iterations. You can also specify a Fixed or Variable delay to be applied between each Script iteration completed by a Virtual User during a load Test.
For more information, see Edit the Number of Script Iterations and the Delay Between Iterations.
See also:
Edit the Task Group Schedule Settings
Select the Host Used to Run a Task Group
Specify the Virtual Users Settings for a Script-based Task Group
Edit the Number of Script Iterations and the Delay Between Iterations
The Test Development Process
The HTTP/S load Test development process typically includes the following procedures:
- Create a Test
- Open a Test
- Add Scripts to a Test
- Add Collectors to a Test
- Define Task Group settings, these include:
- Edit the Task Group Schedule Settings
- Select the Host Used to Run a Task Group
- Specify the Virtual Users Settings for a Script-based Task Group
- Edit the Number of Script Iterations and the Delay Between Iterations
- Delete a Script or Collector from a Test
- Duplicate a Task Group
- Disable/Enable a Task Group
- Delete a Task Group
- Replace a Script or Collector in a Test
- Compile a Test
- Save and Close a Test
- Rename a Test
- Delete a Test
See also:
Single Stepping HTTP/S Load Tests
Create a Test
- In Commander select File > New Test > Tests.
- Or: In the Repository Window, right-click
- The Test appears in the Repository Window with a small crossed red circle over the Test icon
- In the Repository Window give the Test a name, which must be an OpenSTA Dataname, with the exception that the name can be up to 60 characters long.
- Press Return.
See also:
Open a Test
- In the Repository Window double-click
- Double-click a new Test
- Note: You do not have to close an open Test or Collector before opening another Test.
- Only a single Test or Collector can be open at one time. When you open a Test, the Test or Collector that was already open is closed and any changes you made are automatically saved.
- When a Test is open in the Test Pane, the Test icon in the Repository Window appears with a small, yellow lock icon overlaid,
. An open Test cannot be renamed or deleted.
- The name of the open Test is displayed in the Commander Title bar.
See also:
Add Scripts to a Test
- Open a Test with the
Configuration tab of the Test Pane displayed.
- Double-click
- Click on a Script then drag it across to the Test Pane and drop it in a row under a Task column as shown below:

- The selected Script, appears in the first empty row under the first Task column in a new Task Group. Additional Scripts can be added in sequence within the same row.
- The Task Group name is taken from the Test name and includes a number suffix which is automatically incremented for each new Task Group added to the Test.
Use the Task Group cell to disable and enable a Task Group.- The Start column indicates the Task Group Schedule settings. For more information on Task Group scheduling, see Edit the Task Group Schedule Settings.
- The Status column displays Task Group activity and status information.
- The Host column defaults to
localhost, which refers to the computer you are currently working on. The Host you select here determines which computer or device will run the Task Group during a Test-run. For more information on selecting a Host, see Select the Host Used to Run a Task Group.
- The VUs column displays the number of Virtual Users assigned to run a Task Group. The default is a single Virtual User
1.
The number of Virtual Users running the Task Group can be changed by selecting the VUs cell and using the Properties Window to enter a new value. For more information, see Specify the Virtual Users Settings for a Script-based Task Group.- With the Script Task you have just added selected, use the Properties Window at the bottom of the Configuration tab to specify the Task settings. For more information, see Edit the Number of Script Iterations and the Delay Between Iterations.
- If your Task Group incorporates more than one Script, select the next Script from the Repository Window, then drag and drop it into the same Task Group row under the next empty Task column cell. Repeat this process until your Script sequence is complete.
- Note: If the Scripts included in a Task Group target a WAE that uses cookies or issues session identities, you need to model them before the Task Group will replay correctly when the Test is run. Add additional Scripts to a Test in a new Task Group by dragging and dropping them into the next empty row.
Note: Your changes are saved automatically in the Repository when you switch to a different function or exit from Commander.See also:
Developing a Modular Test Structure
Edit the Task Group Schedule Settings
Select the Host Used to Run a Task Group
Specify the Virtual Users Settings for a Script-based Task Group
Edit the Number of Script Iterations and the Delay Between Iterations
Add Collectors to a Test
Note: You can add and run new Task Groups during a Test-run.
- Open a Test with the
- Double-click
- Click on a Collector then drag it across to the Test Pane and drop it in an empty row under the Task 1 column, as shown below:
- The Task Group name is taken from the Test name and includes a number suffix which is automatically incremented for each new Task Group added to the Test.
- The Start column indicates the Task Group Schedule settings. For more information on Task Group scheduling, see Edit the Task Group Schedule Settings.
- The Status column displays Task Group activity and status information.
- The Host column defaults to
- The Host you select here determines which computer or device will run the Task Group during a Test-run. For more information on selecting a Host, see Select the Host Used to Run a Task Group.
- Note: Your changes are saved automatically in the Repository when you switch to a different function or exit from Commander.
See also:
Edit the Task Group Schedule Settings
Select the Host Used to Run a Task Group
Edit the Task Group Schedule Settings
- Open a Test with the
- Click on the Start cell in a Task Group.
- In the Start Task Group section of the Properties Window, click
to the right of the selection box and choose a start option:
- Scheduled: The Task Group starts after the number of days and at the time you set.
Enter a time period using the Days and Time text boxes.- Immediately: The Task Group starts when the Test is started.
- Delayed: The Task Group starts after the time period you set, (days: hours: minutes: seconds), relative to when the Test was started.
Enter a time period using the Days and Time text boxes.
- In the Stop Task Group section of the Properties Window, click
- Manually: The Task Group will run continuously until you click the Stop button in the Status column of the Task Group that activates during a Test run.
- After fixed time: The Task Group is stopped after a fixed period of time.
Enter a time period using the Time Limit text box.- On Completion: The Script-based Task Group is stopped after completing a number of iterations.
Enter the number of Task Group iterations in the Iterations text box.See also:
Select the Host Used to Run a Task Group
Select the Host Used to Run a Task Group
Note: Collector-based Task Groups include a Collector which defines a set of data to be recorded from one or more target Hosts during a Test-run. The Host you select in the Test table determines which computer or device will run the Task Group during a Test-run, not the Host from which data is collected.
- Open a Test with the
- Click on the Host cell,
- In the Host Name text box of the Properties Window, enter the name of the Host to run the Task Group. Your settings are then displayed in the Test table.
- Note: The Host you select must have the OpenSTA Name Server installed and running with the Repository Host setting pointing to the local Host. For more information on configuring the Hosts used to run a Test, see Distributed Tests.
- Note: Your changes are saved automatically in the Repository when you switch to a different function in or exit from Commander.
See also:
Specify the Virtual Users Settings for a Script-based Task Group
Specify the Virtual Users Settings for a Script-based Task Group
- Open a Test with the
- Click on the VUs cell
of the Task Group whose Virtual User settings you want to edit. The current Virtual User settings are displayed in the Properties Window at the bottom of the Configuration tab. Use it to help control the load generated during a Test-run by specifying the number of Virtual Users and when they start.
- In the Properties Window enter a value in the first text box to specify the total number of Virtual Users for the Task Group, or use
to set a value.
- Select the Logging level required for the Task Group to control the level of performance statistics and Timers gathered from Virtual Users. Click
Low: Information collected from the first 10 Virtual Users in the Task Group.
High: Information collected from all the Virtual Users in the Task Group.
None: No performance statistics or Timers are gathered.- Click the Generate Timers For Each Page check box, to record results data for the time taken to load each Web page specified in the Scripts, for every Virtual User running the Scripts. Timer information is recorded for the duration of the complete Script if the box is checked or unchecked.
- Click on the Introduce Virtual Users in batches check box if you want to ramp up the load you generate by controlling when the Virtual Users you have assigned run. This is achieved by starting groups of Virtual Users in user defined batches.
- Use the Batch Start Options section to control your Virtual user batch settings.
- Interval between batches, specifies the period of time in seconds between each ramp up period. No new Virtual Users start during this time.
- Number of Virtual Users per batch, specifies how many Virtual Users start during the batch ramp up time.
- Batch ramp up time (seconds), specifies the period during which the Virtual Users you have assigned to a batch start the Task Group. The start point for each Virtual User is evenly staggered across this period.
- The example below depicts the Properties Window, where 20 Virtual Users are assigned to a Script-based Task Group. When the Task Group is run 2 Virtual Users (the number of Virtual Users per batch) will start over a period of 5 seconds (batch ramp up time) with a 10 second delay between each batch running.

- Note: Your changes are saved automatically in the Repository when you switch to a different function in or exit from Commander.
See also:
Select the Host Used to Run a Task Group
Edit the Number of Script Iterations and the Delay Between Iterations
- Open a Test with the
- Click on a Script Task
, whose Task settings you want to edit, to display the current Task settings in the Properties Window at the bottom of the Configuration tab.
- With a Script Task selected, use the Properties Window to specify how long the Task runs. Click on the Task Termination box and select an option, either:
- On Completion: set a value to control the number of times (iterations) a Virtual User will run the Script during a Test-run.
- After Fixed Time, specify a time period to control when the task completes.
- You can specify a Fixed or Variable delay between each iteration of a Script Task.
In the Properties Window, click on the Delay Between Each Iteration box and select an option, either:
- Fixed Delay: set a time value in seconds using the Delay text box.
- Variable Delay: set a value range in seconds using the Minimum and Maximum text boxes to control the upper and lower limits of variable iteration delay.
See also:
Delete a Script or Collector from a Test
- Open a Test with the
- Select an individual Script or Collector Task from within a Task Group.
- Press Delete, or select Test > Delete Selection.
- Note: Deleting a Collector Task removes the Task Group from the Test table, since a Collector-based Task Group can only include a single Collector.
- Note: The Script or Collector you remove is not deleted from the Repository since all Scripts and Collectors are included in Tests by reference.
- Tip: To remove a Script-based Task Group, which contains a sequence of Scripts, right-click on the Task Group and select Delete Task Group.
See also:
Duplicate a Task Group
- Open a Test with the
- Right-click on the Task Group you want to copy.
- Select Duplicate Task Group from the popup menu.
See also:
Disable/Enable a Task Group
Note: When you add a Script or Collector to a Test the default setting is Enabled.
- Open a Test with the
- In the Task Group column click on the check box in the cell of the Task Group that you want to disable.
- Enable a disabled Task Group by clicking on the unchecked check box.
See also:
Delete a Task Group
- Open a Test with the
- Right-click on the Task Group you want to delete, or hold down the Shift key to select more than one Task Group for deletion.
- Select Delete Task Group from the popup menu.
- Note: Deleting a Task Group does not remove the Scripts or Collectors it contains from the Repository because they are included in a Task Group by reference.
- Tip: Delete a Script or Collector from a Test to remove the Task Group from the Test table, since a Collector-based Task Group can only include a single Collector.
See also:
Replace a Script or Collector in a Test
Note: Only Scripts can overwrite other Scripts and only Collectors of the same type can be overwritten using the method below.
- Open a Test with the
- Select the Script or Collector you want to add from the Repository Window and drag and drop it on to the Task cell in the Test Pane containing the Script or Collector that you want to replace.
- Click Yes in the confirmation dialog box to overwrite the Task.
- Note: The Script or Collector you overwrite is not deleted from the Repository since all Tasks are included in Tests by reference.
- Note: Existing Task Group settings are unaffected when you replace a Task.
- Note: Your changes are saved automatically in the Repository when you switch to a different function in or exit from Commander.
See also:
Compile a Test
Before you run a Test you need to compile to check its validity and ensure it will run.
If you have not compiled a Test before you run it, clicking the Test-run button, automatically compiles the Test.
- Open a Test.
- Click
in the toolbar to compile or select Test > Compile Test.
- When your Test compiles successfully you are notified with an on-screen message. Click OK in the dialog.
See also:
Save and Close a Test
- The Test-related work you perform is automatically saved in the Repository and the Test is closed when you switch to a different function or exit Commander.
- Click
, in the Menu Bar.
See also:
Rename a Test
Note: An open Test cannot be renamed.
- In the Repository Window double-click
- Right-click on a Test and select Rename from the menu.
- Enter a new name and press Return.
See also:
Delete a Test
Note: An open Test cannot be deleted.
- In the Repository Window double-click
- Right-click on a Test and select Delete, or select a Test and press Delete.
- Click Yes to confirm the deletion of the Test from the Repository.
See also:
|
OpenSTA.org Mailing Lists Further enquiries Documentation feedback CYRANO.com |