![]()
Creating and Editing Collectors
- Collectors Overview
- Creating Collectors
- The Collector Pane
- SNMP Collectors
- NT Performance Collectors
- General Collector Procedures
Collectors Overview
Collectors are used to monitor and collect performance data from target components of production systems and Web Application Environments (WAEs) during Test-runs, to help you evaluate their performance.
A Collector is a set of user-defined data collection queries which determine the type of performance data recording carried out from one or more Host computers or devices during a Test-run. Include them in your Tests to target specific components of the WAEs under test and the Hosts used to run a Test, with precise data collection queries to collect the performance data you need. Create Collectors and incorporate them into your Tests, then run the Test to generate the results data required.
Collectors give you the flexibility to collect a wide range of performance data at user defined intervals during a Test-run. A Collector can contain a single data collection query and be used to target a single Host. Or alternatively, they can contain multiple queries and target multiple Hosts. NT Performance Collectors are used for collecting performance data from Hosts running Windows NT or Windows 2000. SNMP Collectors are used for collecting SNMP data from Hosts and other devices running an SNMP agent or proxy SNMP agent.
Collectors are stored in the Repository and are included in Tests by reference. This means that any changes you make to a Collector will have immediate affect on all the Tests that use them.
Collector-based Task Groups can be monitored during a Test-run. The specific data collection queries defined within a Collector can be selected and monitored from the Monitoring tab view of the Test Pane.
After a Test-run is complete, results are stored in the Repository from where they are available for immediate display and analysis. The data collected can be displayed alongside results from previous Test-runs associated with the Test, to provide comparative information about target system performance.
Results collected by all the SNMP Collectors included in a Test are saved in the Custom SNMP file. Results collected by all the NT Performance Collectors you include are saved in the Custom NT Performance file. Results are displayed by opening a Test, then using the Results Window displayed in the Results tab of the Test Pane to open the display options listed. Results data can be can be exported to spreadsheet and database programs for further analysis, or printed directly from Commander.
See also:
Creating Collectors
Creating Collectors involves deciding which Host computers or other devices to collect performance data from and the type of data to collect during a Test-run. Create SNMP Collectors to target any Hosts capable of running an SNMP agent or proxy SNMP agent which can include computers and other devices. Or create NT Performance Collectors to collect performance data from Hosts running Windows NT or Windows 2000.
Use the right-click menu function associated with the
Collectors folder in the Repository Window to create a new Collector, or select File > New Collector > SNMP or File > New Collector > NT Performance in the Menu Bar. Give your new Collector a name, then double-click the new Collector icon
(SNMP), or
(NT Performance) in the Repository Window to open it in the Collector Pane. This is the workspace where you can develop a Collector by defining your data collection queries.
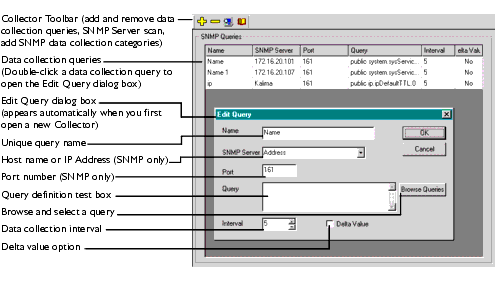
In Commander an open Collector is represented as a table in the Collector Pane. This is the workspace where you can develop a Collector. Each data collection query you define occupies a row within the table. When you first open a new Collector there are no rows or data collection queries defined and the Edit Query dialog box appears automatically. Use this dialog box to setup a new query.
Work through the configuration settings to add a unique query name, choose the Host from which performance data will be collected, select the query type and to specify the frequency for data to be collected. You can also select to record the raw value of the data, or the Delta Value which records the difference between the data collected at each interval.
In existing Collectors that already have one or more data collection queries defined, double-click a row in the table to open Edit Query dialog box and make any changes you need. Use
, in the toolbar to add new rows and define additional data collection queries. Select a row and click
, to delete a query. The Collector settings are automatically saved in the Repository when you switch to a different function or exit from Commander.
There is only a single instance of the Collectors you create. They are included in Tests by reference which means that they can be used in many different Tests. The data collection and monitoring settings you define in a Collector apply to all the Tests that use it. Similarly, any changes you make are immediately reflected in all the Tests that reference it. The Collectors you incorporate into Tests can be removed by overwriting them with new selections or deleting them from a Test, but this does not delete them from the Repository.
NT Performance Collectors are saved as .NTP files, SNMP Collectors are saved as .SMP files. A Collector name must be defined according to the rules for OpenSTA Datanames, with the exception that the name can be up to 60 characters long.
See also:
The Collector Pane
The Collector Pane is displayed in the Commander Main Window, when you open a Collector from the Repository Window. The options, the display and the creation process are similar for both SNMP and NT Performance Collectors.
Double-clicking on a new Collector
SNMP Collectors supply two additional toolbar options, the SNMP Server Scan
, and Edit SNMP Categories
.
The SNMP Servers Scan identifies all networked SNMP Servers currently running an SNMP agent within a defined IP address range. The SNMP Server text box in the Edit Query dialog box is populated with the returned IP addresses from where you can select a target device.
Use Edit SNMP Categories option to create new SNMP data collection categories which you can use to define a query in the Edit Query dialog box.
Collector Pane Features
The Collector Pane with the Edit Query dialog of an SNMP Collector is displayed below:
See also:
SNMP Collectors
SNMP Collectors (Simple Network Management Protocol) are used to monitor and collect SNMP data from Host computers or other devices running an SNMP agent or proxy SNMP agent during a Test-run. Creating then running SNMP Collectors as part of a Test enables you to collect results data to help you assess the performance of WAEs under test.
SNMP is the Internet standard protocol developed to manage nodes on an IP network, but SNMP is not limited to TCP/IP. It can be used to manage and monitor all sorts of equipment including computers, routers, wiring hubs and printers. That is, any device capable of running an SNMP management process, known as an SNMP agent. All computers and many peripheral devices meet this requirement, which means you can create and include SNMP Collectors in a Test to collect data from most components used in target WAEs.
SNMP data collection queries defined in a Collector can be displayed graphically during a Test-run to monitor the performance of the target Host. Select a Task Group that contains an SNMP Collector from the Monitoring Window in the Monitoring tab of the Test Pane then choose the performance counters you want to display.
The results collected using a Collector can be viewed after the Test-run is complete. Select a Test and open up the Custom NT Performance graph from the Results tab of the Test Pane to display your results.
Note: The SNMP Module used to create SNMP Collectors is a component of HTTP/S Load.
See also:
SNMP Collector Development Process
SNMP Collector Development Process
- Create an SNMP Collector
- Open an SNMP Collector
- Add SNMP Data Collection Queries
- Run the SNMP Server Scan
- Create New SNMP Data Collection Categories
- Edit Collector Settings
- Save and Close a Collector
- Rename a Collector
- Delete a Collector
Create an SNMP Collector
- In Commander, select File > New Collector > SNMP.
- Or: In the Repository Window, right-click
Collectors, and select New Collector > SNMP.
- The Collector appears in the Repository Window with a small crossed red circle over the icon
, indicating that the Collector has no content.
- Note: After you have opened a Collector and defined a data collection query using the Edit Query dialog box in the Collector Pane, the icon changes to reflect this
.
- Give the new Collector a name within the Repository Window, which must be an OpenSTA Dataname, with the exception that the name can be up to 60 characters long, then press Return.
See also:
Open an SNMP Collector
- In the Repository Window double-click
- Double-click a new Collector
- The Edit Query dialog box opens automatically when you open a new Collector
- Note: You do not have to close an open Collector or Test before opening another Collector.
Only a single Collector or Test can be open at one time. When you open a Collector the Collector or Test that was open is closed and any changes you made are automatically saved.
When a Collector is open in the Collector Pane, the Collector icon in the Repository Window appears with a small, yellow lock icon overlaid,. An open Collector cannot be renamed or deleted.
The name of the open Collector is displayed in the Commander Title bar.See also:
Add SNMP Data Collection Queries
Add SNMP Data Collection Queries
- Open an SNMP Collector.
- If the Edit Query dialog box does not appear automatically, click
- In the Name text box enter a unique title for the data collection query.
- Note: When you run a Test the query name you enter is listed in the Available Views text box which is displayed in the Monitoring tab of the Test Pane. You can select query names to monitor the progress of the Test-run.
- Query names also appear in the Custom SNMP graph with the associated results data. Use the Results Window in the Results tab of the Test Pane to display them.
- In the SNMP Server text box enter the Host name or the IP address you want to collect data from.
- Tip: You can Run the SNMP Server Scan by clicking
, to the right of the SNMP Server text box to display the list and select an SNMP Server.
- In the Port text box enter the port number used by the target SNMP Server.
- Click the Browse Queries button to open the Select Query dialog box and define the query.
- In the Select Query dialog box, click
- In the Query selection box below, choose a query associated with the selected category.
- Click Select to confirm your choices and return to the Edit Query dialog box.
- In the Edit Query dialog box use the Interval text box to enter a time period (in seconds) to control the frequency of data collection, or use
, to set a value.
- Leave the Delta Value column check box unchecked to record the raw data value, or check the box to record the Delta value.
- Click OK to display the data collection query you have defined in the Collector Pane.
- Use
Run the SNMP Server Scan
Use the SNMP Server Scan option to identify all networked SNMP Servers currently running an SNMP agent within a defined IP address range. Run the scan before defining a query.
- Open an SNMP Collector.
- Click
- In the SNMP Server Scan dialog box, edit the IP address range entered in the Start IP and End IP text boxes to control the range of the scan if required.
- In the Port text box enter the correct SNMP port number.
- Click Scan to initiate the scan.
- The scan identifies SNMP Servers and populates the SNMP Server text box in the Edit Query dialog box with the returned IP addresses. Click
- Note: If you switch to a different function, such as opening a Test or Collector, the scan results are not saved.
Create New SNMP Data Collection Categories
Use this option to create new SNMP data collection categories which you can select when you define a new query in the Select Query dialog box.
- Open an SNMP Collector.
- Click
- In the Category Definition dialog box, click in the Name text box and enter the title of the new data collection category.
- In the Walk Point text box enter the query definition.
- Click Apply to make the new category available for selection. Click Close to cancel.
NT Performance Collectors
NT Performance Collectors are used to monitor and collect performance data from your computer or other networked Hosts running Windows NT or Windows 2000 during a Test-run. Creating and running NT Performance Collectors as part of a Test enables you to collect comprehensive data to help you assess the performance of WAEs under test.
Use NT Performance Collectors to collect performance data during a Test-run from performance objects such as Processor, Memory, Cache, Thread and Process on the Hosts you specify in the data collection queries. Each performance object has an associated set of performance counters that provide information about device usage, queue lengths, delays, and information used to measure throughput and internal congestion.
NT Performance Collectors can be used to monitor Host performance according to the data collection queries defined in the Collector during a Test-run. Performance counters can be displayed graphically by selecting the Task Group that contains the Collector from the Monitoring Window in the Monitoring tab of the Test Pane.
The results recorded using a Collector can be monitored then viewed after the Test-run is complete. Select a Test and open up the Custom NT Performance graph from the Results tab of the Test Pane to display your results.
If the Web server under test is running Microsoft IIS (Internet Information Server), then you can monitor it by selecting the Web Service performance object from the Performance Object selection box when you add a new data collection query.
Note: The NT Performance Module used to create NT Performance Collectors is a component of HTTP/S Load.
See also:
NT Performance Collector Development Process
NT Performance Collector Development Process
- Create an NT Performance Collector
- Open an NT Performance Collector
- Add NT Performance Data Collection Queries
- Edit Collector Settings
- Save and Close a Collector
- Rename a Collector
- Delete a Collector
Create an NT Performance Collector
- In Commander, select File > New Collector > NT Performance.
- Or: In the Repository Window, right-click
- The Collector appears in the Repository Window with a small crossed red circle over the Collector icon
- Note: After you have opened a Collector and defined a data collection query using the Edit Query dialog box in the Collector Pane, the icon changes to reflect this
.
- Give the new Collector a name within the Repository Window, which must be an OpenSTA Dataname, with the exception that the name can be up to 60 characters long, then press Return.
See also:
Open an NT Performance Collector
Open an NT Performance Collector
- In the Repository Window double-click
- Double-click a new Collector
- The Edit Query dialog box opens automatically when you open a new Collector
- Note: You do not have to close an open Collector or Test before opening another Collector.
Only a single Collector or Test can be open at one time. When you open a Collector the Collector or Test that was open is closed and any changes you made are automatically saved.- When a Collector is open in the Collector Pane, the Collector icon in the Repository Window appears with a small, yellow lock icon overlaid,
. An open Collector cannot be renamed or deleted.
- The name of the open Collector is displayed in the Commander Title bar.
See also:
Add NT Performance Data Collection Queries
Add NT Performance Data Collection Queries
- Open an NT Performance Collector.
- If the Edit Query dialog box does not appear automatically double-click on a query.
- In the Name text box enter a unique title for the data collection query.
- Note: When you run a Test the query name you enter is listed in the Available Views text box which is displayed in the Monitoring tab of the Test Pane. You can select query names to monitor the progress of the Test-run.
Query names also appear in the Custom NT Performance graph with the associated results data. Click the Results tab in the Test Pane and display them.- Click the Browse Queries button to open the Browse Performance Counters dialog box and define the query.
- In the Browse Performance Counters dialog box, select the Host you want to collect data from. You can select to either:
- Use local computer counters: Collects data from the computer you are currently using.
- Or, Select counters from computer: Enables you to specify a networked computer. Type \\ then the name of the computer, or click
and select a computer from the list.
- In the Performance object selection box select a performance object. Click
- In the Performance counters selection box choose a performance counter.
- In the Instances selection box pick an instance of the selected performance counter.
- Click OK to confirm your choices and return to the Edit Query dialog box.
- In the Interval text box enter a time period (in seconds) to control the frequency of data collection, or use
- Leave the Delta Value column check box unchecked to record the raw data value, or check the box to record the Delta value.
Delta value records the difference between the data collected at each interval.- Click OK to display the data collection query you have defined in the Collector Pane.
- Use
, in the toolbar to add additional queries.
Tip: Double-click on a query to edit it. Select a query then click, in the toolbar to delete it.
Note: The Collector is saved automatically in the Repository when you switch to a different function or exit from Commander.General Collector Procedures
See also:
Edit Collector Settings
- In the Repository Window double-click
- Double-click a Collector to open the Collector Pane in the Commander Main Window, where you can make your edits.
- If the Edit Query dialog box does not open automatically, double-click on a data collection query to open it.
- Make your edits to the query using the Edit Query dialog box.
- Click OK to apply your changes.
- Click
- Select a SQL request then click
See also:
Save and Close a Collector
- The Collector-related work you perform is automatically saved in the Repository and the Collector is closed when you switch to a different function or exit from Commander.
- Click
, in the Menu Bar.
Rename a Collector
Note: An open Collector cannot be renamed.
- In Commander, double-click
- Right-click on a Collector and select Rename, or double-click slowly on a Collector.
- Enter the new name and press Return, to save your changes in the Repository.
- Note: When you rename a Collector the Tests that reference it notify you that it is missing by highlighting the Task table cell it occupied in Red. The Test cannot run with a missing Task. Rename or recreate a Collector to match the name of the missing Collector to resolve this problem or delete the Task from the Test.
Delete a Collector
Note: An open Collector cannot be deleted.
- In Commander, double-click Collectors
- Right-click on a Collector and select Delete from the menu.
- Click Yes to confirm the deletion.
- Note: When you delete a Collector the Tests that reference it notify you that it is missing by highlighting the Task table cell it occupied in Red. The Test cannot run with a missing Task. Recreate a Collector to match the name of the missing Collector to resolve this problem or delete the Task from the Test.
|
OpenSTA.org Mailing Lists Further enquiries Documentation feedback CYRANO.com |