![]()
Recording a Script
Scripts form the content of an HTTP/S performance Test using OpenSTA. After you have planned a Test the next step is to develop its content by creating the Scripts you need.
Launch Script Modeler from Commander to create and model Scripts. Then incorporate the Scripts into your performance Tests.
- Create a New Script Using Commander
- Familiarizing yourself with the Script Modeler
- Planning your Script
- Configuring Script Modeler for Script Creation
- Recording a Web Session
Create a New Script Using Commander
- In Commander select File > New Script > HTTP.
- Or: In the Repository Window, right-click
Scripts, and select New Script > HTTP.
- The Script appears in the Repository Window with a small crossed red circle over the Script icon
, indicating that the file has no content. As soon as you open the Script and record a Web session, the icon changes to reflect this and appears
.
- Name the new Script FINDBYNAME, from the Repository Window, then press Return.
- Note: Script names must be OpenSTA Datanames.
- After you have created an empty Script it appears in the Repository Window, Scripts folder.
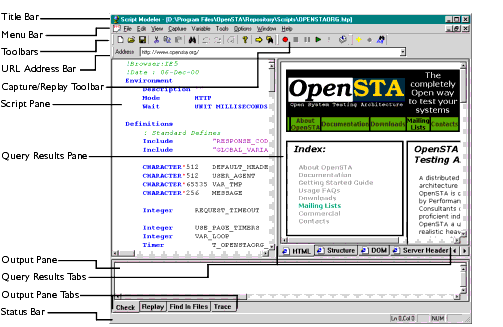
Script Modeler
Script Modeler supplies versatile Script creation and modeling functionality. Use the menu bar and right-click menu options to create and model Scripts.
After you create a Script or when you open one, it is displayed in the Script Pane on the left-hand side of the main window. It is represented using SCL code which enables you to model it using the menu options or directly by keying in the SCL commands you need.
The Query Results Pane is used to display Web site responses. HTML information is recorded during the same Web session as the corresponding Script and is directly related to it, which enables additional modeling options.
The Output Pane. Displays the results of Script compilation. Scripts need to be compiled after modeling to check the validity.
Script Modeler Interface Features
Planning your Script
Before recording a Script make sure you are familiar with the Web site you are going to test. Ensure that it is functioning correctly and that you understand its basic behavior.
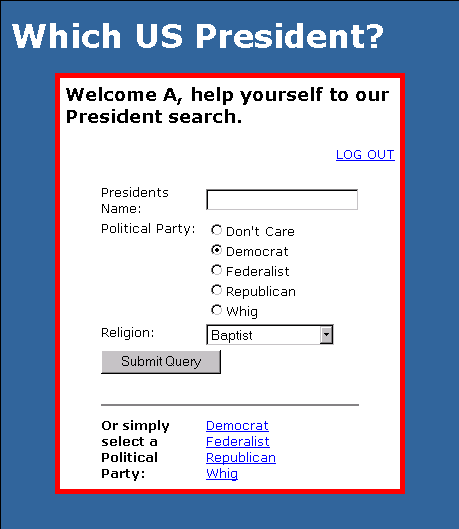
Below is a summary of the demonstration Web site, Which US President?.
The Demo Web Site
Which US President? is a simple WAE that provides a variety of information concerning past presidents of the United States. The presidents are selected through a filtering search.
The application has five sections of interest:
- Login Page: POST Form with text and password fields and a Submit button.
- The Login page requires a user ID and password. To keep the CGI simple yet have a realistic login, there is no pre-defined user database: passwords are authenticated by being the reverse of the user ID. For example, the password for the user ID "guest" is "tseug". The login session is maintained by the use of a site cookie.
- Search Form: POST Form with a text field, a set of radio buttons, a select menu and a Submit button.
- Predefined search links: Cause GET requests to access the search form, but via an alternative URL encoded mechanism.
- Search output: titles and a table containing the formatted results of the query.
- Log out link: Cause GET request with URL encoded values that logs the application out.
Configuring Script Modeler for Script Creation
The next step is to set up the correct Script recording environment. This includes selecting the type of browser you want to use to record Scripts and ensuring that your browsers proxy server settings are correctly configured.
Script Modeler's recording mechanism makes use of a proxy server, known as the Gateway, which is used to intercept and record the HTTP/S traffic generated during a Web session. This recording mechanism involves temporarily adjusting the proxy server settings of the browser you use for the duration of the recording.
There is currently a limitation in this recording mechanism. If your browser gets its proxy configurations through any of the available automated mechanisms, Script Modeler cannot adjust your proxy server settings and correctly configure the Gateway. For the recording mechanism to work, the browser must either have no proxy server configured or have a manually supplied proxy server and port configured. If you are unsure if this is the case, or do not know how to configure your browser in this manner, talk to your system administrator.
Before you can create a Script you need to select the browser you want to use for the recording.
Select Browser Type for Script Recording
- Create a new Script using Commander.
- Open the Script from the Repository Window.
- In Script Modeler, select Options > Browser.
- In the Select Browser dialog box, click
, and select the browser you want to use from the list, either Internet Explorer 4, Internet Explorer 5 or Netscape.
- Click OK to save your settings.
Recording a Web Session
After you have selected a browser and configured the Gateway, you are ready to record a Web session and create a Script.
When you begin recording a Web session use the browser as normal and move through the Web site performing the steps you want to record. In this example, the first step is to go to the login page of the demonstration Web site Which US President?, by typing in the URL of your locally installed copy.
Recording a Script
- After you have created an empty Script it appears in the Repository Window, Scripts folder.
- Click the Record button
, in the Capture/Replay Toolbar, or select
Capture > Record, to begin the HTTP/S capture process.
- This action launches the Gateway and the Web browser you have selected.
- Your browser's Home page Internet option is overridden by Script Modeler when you start recording. The setting is replaced with about:blank, which specifies that your home page will be a blank HTML page. This ensures that your normal Home page is not launched and recorded in the Script.
- Type in a URL of the demonstration Web site Which US President?, and hit Return.
- Type A in the Log-in and Password text boxes.
- Click the login button.
- In the Presidents Name text box, type in part of a president's name, for example Truman.
- Click the Submit Query button.
- After you have completed your search you need to Log-out.
- After you have completed the browser session, either close the browser window to end the recording, or switch back to Script Modeler and click the Stop button
, in the Capture/Replay Toolbar.
- When you have finished recording the Script the SCL formatted data is displayed in the Script Pane as illustrated below:
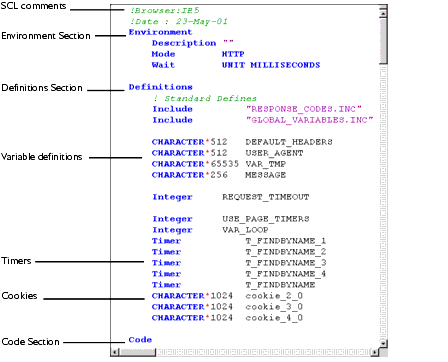
- The Script represents the data it contains using syntax coloring to help identify the different elements. For example, SCL keywords and commands are represented in blue. A Script is divided into three sections represented by the following SCL keywords; Environment, Definitions and Code.
- The Environment Section
The Environment section is always the first part of a Script. It is introduced by the mandatory Environment keyword. It is preceded by comments written by the Gateway which note the browser used and the creation date. This section is used to define the global attributes of the Script including a Description, if you choose to add one, the Mode and Wait units.- The Definitions Section
The Definitions section follows the Environment section and is introduced by the mandatory Definitions keyword. It contains all the definitions used in the Script, including definitions of variables and constants, as well as declarations of timers and file definitions.- It also contains the global_variables.INC file which is used to hold variable definitions of global and Script scope which are shared by Virtual Users during a Test-run, and the Response_Codes.INC, an include file which contains the definitions of constants which correspond to HTTP/S response codes.
- The Code Section
The Code section follows the Definitions section and is introduced by the mandatory Code keyword. It contains commands that represent the Web-activity you have recorded and define the Script's behavior. The Code section is composed of SCL commands that control the behavior of the Script.- Before you save your new Script you need to compile it using the Syntax Check option to ensure the validity of the recording.
Select Capture > Syntax Check or click, in the Capture/Replay Toolbar. Compilation results are reported in the Output Pane. If compilation is unsuccessful, you may need to re-record the Script or model the contents to resolve the problem.
- After compilation replay the Script to check the activity you have recorded.
Select Capture > Replay or click, in the Capture/Replay Toolbar
- When you have finished recording, click
, in the Standard Toolbar to save your Script in the Repository, or click File > Save.
- Select File > Close to close the current Script or File > Exit to exit Script Modeler.
Query Results Pane
After you have finished recording you can also view the HTML information recorded at the same time as the Script. You can access this data by opening a Script in Script Modeler then selecting a URL you want to view from the URL Address Bar and clicking the URL Details button
, in the Standard Toolbar. HTML information is organized into five categories:
- HTML: Shows a browser view of the HTML document that has been retrieved.
- Structure: Shows the basic elements of the page in a collapsing tree view.
- DOM: Shows the page structure in the Document Object Model, as a collapsing tree view.
- Server Header: Shows the HTTP response headers that the Web server returned to the browser.
- Client Header: Shows the HTTP request headers provided by the browser for the Web server.
Before you exit from Script Modeler make sure you have saved your Script then select File > Exit to exit Script Modeler.
Next...
Now you have created a Script you are ready to model it.
Modeling a Script is not an essential procedure but it can be useful to modify Scripts using variables for example, to better simulate the activity of real Web users when a Test is run.
Next Section: Modeling a Script
Back to Contents
|
OpenSTA.org Mailing Lists Documentation feedback |