![]()
Script Development
After you have planned your performance Test structure, you need to develop the Test contents by recording the Scripts that will be included in your Tests. Launch Script Modeler from Commander to record and model Scripts, then incorporate them into your Tests using Commander.
Scripts are HTTP/S recordings of the web sessions you conduct using Script Modeler which represent the HTTP/S traffic they record as SCL code. The browser requests recorded are automatically encoded using SCL during the capture process. This gives the HTTP/S data an intelligible structure and makes it possible to model the Script. Script Modeler's editing capabilities enable you to record and edit Scripts to simulate the behavior of thousands of virtual users when a Test is run.
Scripts form the content of your Tests and enable you to generate the web activity you want during a Test-run. They are stored in the Repository, which is displayed in the Commander Main Window. From here they can be selected for inclusion by reference in multiple Tests.
When you run a Test, the Scripts that it incorporates are run according to the Task Group settings you have specified in Commander. These settings determine the load directed against the target web site when a Test is run. Scripts encapsulate the web activity you need to reproduce and the Task Group settings control the way the Scripts are run. Together, these elements control the type of the test environment that is simulated when a Test is run.
Before you begin to record your Scripts you should check your recording configuration. There are several options to choose from depending on the software setup you have on your computer and the network configuration you are working within. You can select the type of browser you want to use to record your Scripts, as well as the method of connecting to the target web site.
The Gateway and Script Creation
Script Modeler enables you to create Scripts by rerouting the HTTP/S traffic that passes between a browser and web sites, through the Gateway and recording the data it intercepts. The Gateway achieves this by temporarily overriding the Local Area Network (LAN), settings specified in your browser when you begin recording a Script. The browser's proxy server settings are temporarily modified in order to force it to use a proxy server when the browser is launched. This override directs the browser's internet connection through the Gateway which functions as the specified proxy server.
The Gateway listens for browser requests then forwards them to the target web site, or to another proxy server if your browser normally has one defined, and then on to the web site. When you start recording a Script, your web browser is launched and the Gateway records the HTTP/S requests along with the web site's responses to your browser.
The home page, address settings of your browser are also temporarily altered by the Gateway during Script recording. This removes all reference to the home page URL from the Script, since it is unlikely to form a part of the Script you create. Enter a URL in the Address text box to launch the web site of your choice. When you have completed your recordings the original browser settings are restored.
Local Area Network Settings
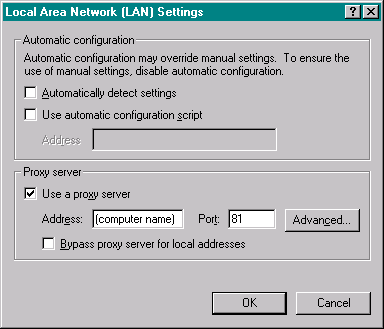
The Local Area Network (LAN) settings for your browser are temporarily modified by Script Modeler, when you begin recording a Script and for the duration of the recording session. Script Modeler forces your browser to use a proxy sever in order to re-route HTTP/S traffic through the Gateway where it is recorded. The configuration of any existing proxy server settings you may have, are unaffected by this temporary alteration of your browser settings. So browser requests are correctly forwarded from the Gateway to the web site. Your browser's original proxy settings are restored after the capture process is complete.
The Gateway has two recording modes, local and remote. In local mode the internet connection settings are overridden as described above. Whereas in remote recording mode you need to modify the proxy settings of the remote browser manually in order to use the proxy Gateway.
Note: Script Modeler cannot establish an internet connection if the Proxy server settings include Automatically detect settings or Use automatic configuration script. To overcome this difficulty you can either disable the use of all proxy severs or manually enter the name and port of the proxy sever. You may need to see your system administrator for this information.
Note: The Address and Port details will vary according to your network configuration and the Internet Service Provider you use.
Using a Dial Up Connection
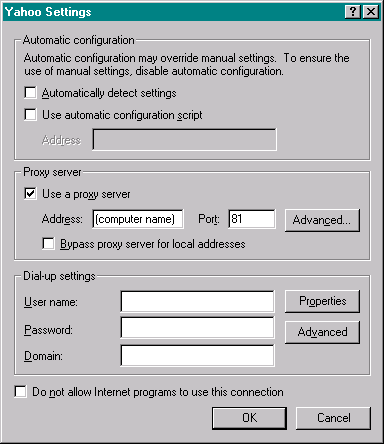
A dial up internet connection setup involves establishing a connection within Script Modeler when you begin an HTTP/S recording and the browser is launched. As well as entering your dial up settings, including user name and password, you must manually change the proxy server settings. Script Modeler only automates the configuration of the proxy server settings for a LAN connection. You need to select to use a proxy server to direct your internet connection through the Gateway.
2 In the Settings dialog box, click the Use a proxy server check box, enter the Address (your computer name) and Port details (port no. 81).
The Script Recording Process
Script Modeler creates a Script exactly as the browser requested the web pages and their contents. They are created by the Gateway and consist of SCL code, including GET, POST and HEAD commands, which represent corresponding HTTP/S instructions.
Scripts represent HTTP/S browser requests in SCL code and are saved in a .HTP file. During the same recording session the corresponding web site responses are recorded by the Gateway in a .ALL file. This includes DOM, HTML and web page structure data. The full detail of a web session is stored in these two files.
After you have clicked the Record button
in the Capture/Replay Toolbar and entered the first URL in your browser's Address text box, the web site responds by sending the HTTP/S data that forms the content of the web page displayed by your browser.
Loading a web page involves parsing or compiling the web page structure from the raw HTTP/S data returned by the web site in response to the URL or PRIMARY GET. The content is then rendered on screen by the browser whilst concurrently making additional, asynchronous requests on other TCP connections via secondary GETs for the remaining contents of the web page. The browser continues to issue requests and render any remaining content until the web page is fully loaded. The Gateway records and formats this information.
The Script Modeler HTTP/S capture process is illustrated below:
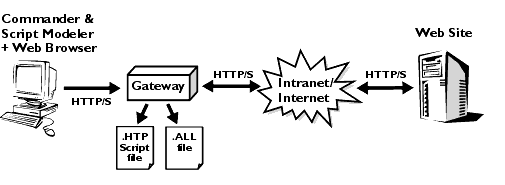
Browser requests hit the web site via the Gateway, across the Web or a network. Browser requests are recorded by the Gateway as a Script (.HTP file). Web site responses are recorded by the Gateway in a .ALL file.
Configuration Options
Before you capture a new Script there are some configuration options available within Script Modeler that you may want to check or change. Some of these options relate to the type of web browser(s) you have installed on your computer, the settings you have specified for them and the Gateway recording mode you want to use, either Local or Remote.
Other configuration options available relate to Gateway settings that can assist you during the recording process and afterwards if you need to model your Script.
You can opt to display a command line console which displays the activity of the Gateway during recordings and to trace this activity.
Another Gateway setting allows the automatic generation of variables to replace any cookies received during a web session. Automating the substitution of a variable for the unique identity of the original cookie transmitted helps to simplify modeling and speed up the development of your Tests.
Use the Options menu choices to configure your settings.
Browser Settings
If you have more than one type of browser installed on your computer, you can choose which one you want to launch in order to record your Scripts.
OpenSTA currently supports Internet Explorer 4 and 5, and Netscape Navigator 4.7, for use in HTTP/S captures. If you have several browsers installed on your computer you may want to specify which browser is launched when you begin recording a Script. If you have more than one of the browser types mentioned installed and you do not select one, Script Modeler defaults to the latest version of Internet Explorer installed on your computer.
2 In the Select Browser dialog box, click, and select the browser you want from the list, either Internet Explorer 4, Internet Explorer 5 or Netscape.
Configuring The Gateway: Local and Remote Recording
You can choose to record Scripts on your own computer or through another remote computer by selecting the appropriate Gateway recording mode, either Local or Remote.
In local recording mode the browser you have selected to use is launched when you begin the HTTP/S capture process you are recording from. The default mode for capturing HTTP/S traffic through the Gateway is Local. In this mode the Gateway listens on port 81 for HTTP/S traffic by default.
If there is no browser installed, or if you want to use another computer to record your Scripts, you can choose the Remote recording mode. You can use any networked computer with a browser installed to conduct remote Script recording. If you use Remote recording mode you must manually modify the proxy server settings of the browser on the remote computer. Make a note of these settings because you need to copy them exactly into the Gateway settings on the computer from where you are recording.
Note: Local Recording Mode is the default setting.
Note: If you selected to use Netscape Navigator 4.7 to conduct your recordings, then a browser Information dialog appears.
Clickand locate the Netscape preferences file prefs.js. After you have selected the file, click OK to move on to the Gateway dialog box.
3 Type in an Administration Port and Port number if the defaults displayed here are in use. Otherwise accept the defaults displayed.
Note: The Administration Port is used for internal communication between Script Modeler and the Gateway.
Note: If you selected to use Netscape Navigator 4.7 to conduct your recordings, then a browser Information dialog appears.
Click
3 Type in an Administration Port and Port number if the defaults displayed here are in use. Otherwise accept the defaults displayed.
Note: The Administration Port is used for internal communication between Script Modeler and the Gateway.
4 In the Proxy section of the Gateway dialog box, the selections you make must reflect the settings specified in the Proxy settings dialog of the remote computer you are using, these settings include:
· Proxy Address and Port: Enter the address and port number of the proxy server you want to use to connect to the Internet.
· Secure and Port: Enter the address and port number of the secure proxy server you want to use to connect to the Internet.
· Bypass proxy server for local addresses: Check the box if you do not want to use the proxy server for all local addresses, including intranet addresses. Note: You might be able to gain access to local addresses easier and faster if you do not use the proxy server.
· Do not use proxy server addresses beginning with: Enter the web addresses that do not need to be, or should not be, accessed through the Proxy server.
Gateway Settings
The Settings section of the Gateway dialog box offers you options which you can select to enhance the quality of the Scripts you record and improve the visibility of the recording process.
Select the Console option to display a command line window during the recording process. The console displays Gateway activity during the web session.
Select the Automatic Cookie Generation option to automate the processing of any cookies you record in your Scripts. If the web site you are testing generates cookies, then enabling this function can help to speed up the Test creation process. This option automatically substitutes the unique identities of any cookies received from a web site with a variable. The automatic modeling of cookies is an optional feature but active by default.
Automatic Cookie Generation
If cookies are issued by web sites under test, they are recorded in the Scripts you create. Cookies contain a unique session identity that would be rejected by the web site if it was used by a Virtual User during at Test-run and the Test would fail. Modeling cookies is an essential procedure to enable Scripts to be used in Tests.
Selecting to automatically model cookies removes the need to perform this task manually and improves the efficiency of the Test development process. The unique identity encapsulated by a cookie, incorporating details about the original web session recording and other information, is automatically assigned to a variable. This enables you to include a sequence Scripts in a Task Group and develop a modular Test structure without having to model the cookie information.
If you are developing a Test that combines multiple Scripts which contain cookies, you need to save the ID's of the cookies they contain in the global_variables.INC file within Script Modeler. Then assign this file to each Script so that they share the same identity and function correctly during a Test-run.
This console displays the Gateway initiating HTTP/S connections and receiving web site responses, concurrent to the actions you perform using the browser.
Creating New Scripts
After you have configured the Gateway and selected a browser, as well as clearing the browser memory cache if you want to simulate first time users, you are ready to begin the HTTP/S capture process.
Recording Scripts is straightforward. In the Commander Menu Bar select File > New Script > HTTP, or right-click Scripts
in the Repository Window and select New Script from the menu. Give the Script a name, press return and double-click the new Script icon
in the Repository Window to launch Script Modeler. Use the Capture/Replay Toolbar or the Capture Menu Bar option in Script Modeler to control the process. When you save the Script it appears in Repository Window from where you can drag and drop it into one or more Tests.
After you have recorded a Script you can either save it or begin the next recording by selecting File > New. You can have several Scripts open at the same time if required so you can either save your Scripts as you record them or before you exit. Press Ctrl > Tab to switch between the Scripts you have open.
You can record multiple Scripts during the same web session using the Capture/Replay Toolbar to control the process instead of closing the browser to end a recording. This technique is useful when developing a modular Test structure since the session identity recorded by all the Scripts is the same.
Two files are generated during a recording session, a .HTP file, which records the web browser requests, and a .ALL file which records the web site responses and contains HTML data. They are saved in the Repository, for example:
Note: A Script name must be defined according to the rules for OpenSTA Datanames, with the exception that the name can be up to 60 characters long.
Capture/Replay Toolbar
The Capture/Replay Toolbar is located below the Menu Bar in the Script Modeler window. The functions it contains are also available from the Capture menu option.
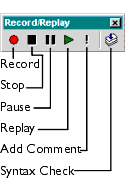
Click the Record button
When you have recorded everything you need, end your recording session by clicking the Stop button
, or close down the browser.
The Script appears in the Repository Window with a small crossed red circle over the Script icon.
2 Give the new Script a name within the Repository Window, which must be an OpenSTA Dataname, with the exception that the name can be up to 60 characters long, then press Return.
4 Click the Record button
The browser initially attempts to open an invalid URL, `about:blank' which results in the display of an error page. This is a deliberate override of your internet options home page settings to ensure that the home page is not launched and therefore not recorded in the Script.
Note: The Gateway is launched in Local recording mode by default unless you have chosen Remote recording mode.
5 Type in a URL and hit Return or select a URL from the browser's URL Address bar. Then use the browser as normal to perform the actions you want to record in your Script.
6 After you have completed the browser actions you need, either close the browser window to end the recording, or switch Alt + Tab back to Script Modeler and click the Stop button
Note: If you have more than one Script to record use
When you have finished recording the Script the SCL formatted data is displayed in the Script Pane as illustrated below:
7 Before you save your new Script you need to compile it using the Syntax Check option to ensure the validity of the recording.
Select Capture > Syntax Check or click, in the Capture/Replay Toolbar. Compilation results are reported in the Output Pane. If compilation is unsuccessful, you may need to re-record the Script or model the contents to resolve the problem.
8 After compilation replay the Script to check the activity you have recorded.
Select Capture > Replay or click, in the Capture/Replay Toolbar
9 When you have finished recording, click, in the Standard Toolbar to save your Script in the Repository, or click File > Save.
Note: If you have unsaved Scripts open in Script Modeler, you are automatically prompted to save them before the program closes. Closing down Script Modeler also closes the browser which restores your original browser settings.
Once you have launched Script Modeler you can record additional Scripts.
2 Click the Record button
3 In the Script Name dialog box, give the new Script a name, which must be an OpenSTA Dataname, with the exception that the name can be up to 60 characters long.
Click OK to launch the Gateway and the web browser you have selected and begin recording. Create your Script as usual, see Create a New Script for details.
Note: When you rename a Script the Tests that reference it notify you that it is missing by highlighting the Task table cell it occupied in red when the Test is opened. The Test cannot run with a missing Task. Rename or recreate a Script to match the name of the missing Script to resolve this problem or delete the Task from the Test.
Note: When you delete a Script, the Tests that reference it notify you that it is missing by highlighting the Task table cell it occupied in red when the Test is opened. The Test cannot run with a missing Task. Recreate a Script with the same name as the missing Script to resolve this problem or delete the Task from the Test.
| CYRANO Customer Support: France +33 (0) 1 56 33 40 00 USA +1 (978) 462-0737 UK +44 (0) 1274 761024 support-fr@cyrano.com support-us@cyrano.com support-uk@cyrano.com |
 , in the Standard Toolbar, or press Ctrl + N.